Join us on Discord

Welcome to the Enemy Series, Seekers!
In this series of updates, lead developer Steve Margetson will be taking us behind-the-scenes for an exclusive look at how we develop board game logic for video game enemies.
Ready to untangle the mechanics that make those massive machines and hostile bandits work on the tabletop?
Know Your Enemy - Enemy Data Cards for Horizon Zero Dawn™: The Board Game
By Steve Margetson
I vividly remember my first encounter with the subterranean Rockbreaker in the Horizon Zero Dawn™ video game. The spectacle. The difficulty. The satisfaction of breaking its components, and the feeling of elation as I finally downed it.
And I’m not alone. Anyone who’s played Horizon Zero Dawn™ could tell a similar story. Taking on Rockbreaker was a memorable moment for me, but for our Community Manager, Giblin, it was Thunderjaw that stood out.
That’s the great thing about enemies in Horizon Zero Dawn™: they’re designed to be diverse and uniquely challenging, giving players a wide range of encounters to tackle. But that’s also what tested us as developers. Because when you’re looking to incorporate such a varied cast of enemies, it’s easy to get caught up in the details.
Start Simple, Think BIG
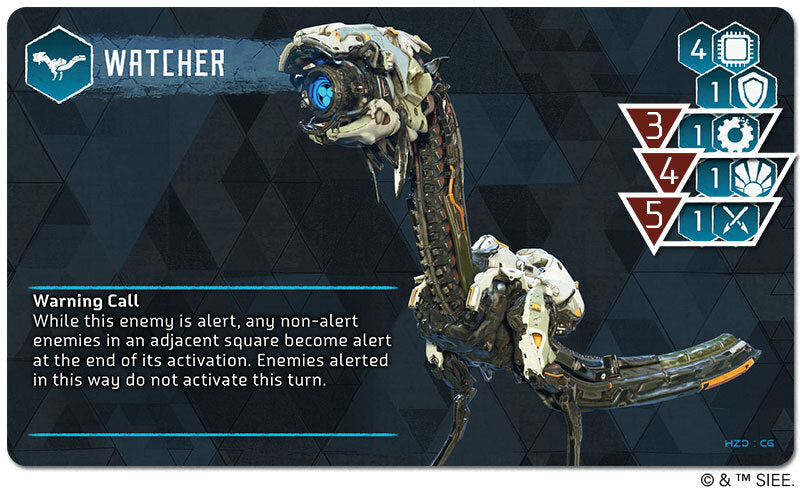
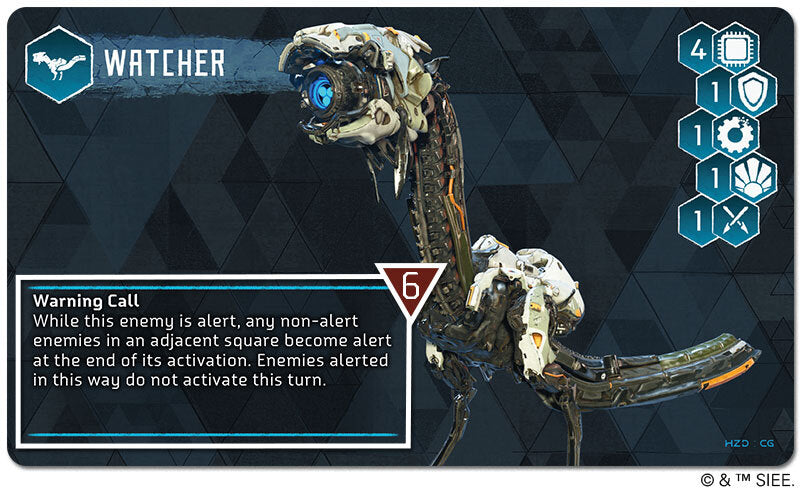
To keep things simple—to begin with!—we started with a card. So every enemy, no matter how big or small, has a data card. On it, you’ll find all the information about how that enemy functions in the game.
Because they include so much information, the data cards might look intimidating at first. But don’t worry; you’ll quickly get the hang of reading them.
Let’s start at the top of the card.
Anatomy Of An Enemy Data Card

Every enemy has a unique icon. You’ll see this used in encounter setup diagrams to show where enemies should be placed.
For example, the card below has the Watcher icon on the A spawn points, and Strider icon on the B spawn points.

The next key element of an enemy data card is the block of numbers and icons in the top right-hand corner. These numbers and icons represent enemy statistics.
The first icon shows the amount of hit points the enemy has. (Red triangle 1)
The higher the hit points, the harder it will be for the hunters to take down. If the enemy takes damage equal to their hit points, they have been defeated, and are removed from the encounter.
For reference, a lowly Watcher has a mere four hit points, whereas a Sawtooth has nineteen!
The next icon shows the armour of the enemy. (Red triangle 2)
The higher the number, the more armoured the enemy is, the more damage it can take.

So whenever an enemy takes damage from a hunter’s attack, the amount of damage taken will be reduced by their armour value.
For example:
The Carja Warrior rolls a 3 when attacking a Watcher with his mighty halberd. The Watcher has an armour of 1, so the roll of 3 is reduced to 2, causing two points of damage to the Watcher.
From a development point of view, adding armour was a logical and substantial way to make enemies resistant to damage. Yes, we could have just increased their health value, but adding armour felt like a good fit for the game.
Plus, the armour statistic gives us more gameplay options and adds variation to hunters. For example, hunters can ignore armour by attacking a non-alert machine, whilst some hunters have abilities or weapons that let them reduce or ignore armour altogether!
Hunter’s Rewards
The last three icons on an enemy data card show the rewards the hunters gain when that enemy is defeated.
The first of these icons shows the salvage value of the enemy. (Red triangle 3)
Whenever a hunter kills an enemy, they immediately gain an amount of salvage equal to the salvage value. The salvage they gain is represented by cards drawn from the salvage deck.
Hunters can then use their salvage as currency to buy important new upgrades from merchants, including weapons, ammo and armour.
The second icon is the glory value. (Red triangle 4)
In short: the hunter who kills that enemy gains that amount of glory.
This icon is key because gaining glory is the aim of every encounter. After all, every hunter wants to prove their machine-hunting skills to the Hunters Lodge!
At the end of each encounter, hunters will be awarded sun tokens based on the amount of glory they earned. And of course, the bigger and more dangerous the enemy, the more glory a hunter gains for taking it down!
The third and final hunter rewards icon is the encounter points icon. (Red triangle 5)
For every enemy killed, all hunters gain encounter points. There are three ways an encounter can end.
If the hunters defeat all enemies, the encounter ends in victory!
If the hunters are defeated too many times, the encounter ends in failure.
But if the hunting party has achieved the number of encounter points listed on the encounter card, the hunters can choose to end the encounter without defeating all the enemies.
The third option should be treated as a last resort, to be used only when the hunt goes bad and the hunters become the prey!
Like glory points, bigger and more dangerous enemies will likely be worth more encounter points.
Special Rules
Now we’ve covered the icons, let’s move on to special rules.
Adding special rules was one way for us to inject flavour and authenticity into enemy encounters, in a way that reflected the nature of enemies in the game.
For example, a Watcher’s warning call will alert nearby machines (Red triangle 6). Striders, on the other hand, have a tendency to group up and remain in herds when threatened.
That said, it was important for us to strike a balance between adding realism without increasing complexity. Sure, a rule that captures the nature and feel of an enemy adds satisfaction to the gameplay. But if players consistently forget it, or it’s always slowing down the game, that rule becomes useless at best and annoying at worst.
Components
Last, but not least, are components.

Components are the parts of a machine enemy that can be targeted and removed by hunters. (Red triangle 7)
In the Horizon Zero Dawn™ video game, there’s a heavy focus on Aloy removing components from machines to either deal more damage or disable powerful attacks. Naturally, we had to replicate that experience, or the board game wouldn’t feel authentic.
So, almost every machine in the board game as at least one component that a hunter can remove.
As well as disabling attacks and having other adverse effects on machines, removing components has a direct benefit for hunters. Remember the glory points we mentioned earlier? Well, removing a component provides one glory point to a hunter. Again, gaining glory is the aim of the game!
ATTACKING AND REMOVING COMPONENTS
When a hunter attacks a machine, they can choose to target a component. They make an attack as normal and if that attack exceeds the tear value of the component, it’s destroyed!
When a component is destroyed, the machine suffers damage equal to the damage value of the component. Then, it suffers any effects listed under the component.
For example: destroying the Blaze Canister on the Strider causes it to burst into flames, suffering the fire condition! And then the Strider suffers two damage, as indicated by the component damage number.
So, Do You Know Your Enemy?
And that covers the enemy data cards!
In the next Enemy Series update, we’ll join Steve as he dives into enemy behaviour.
But now, we want to hear from you:
What was your most memorable encounter in Horizon Zero Dawn™ ?
Let us know in the comments.