Join us on Discord

We used the Army Painter range of paints for this tutorial – they have great surface coverage and a wide range of colors. Make sure to shake the paint pot before you apply to your palette to make sure it’s properly mixed. Once you’ve applied the paint to your palette, you will need to thin your paints down with a small amount of water. About a 1:1 ratio will work for most paints.
Due to the size of this miniature you are going to want to use a smaller sized brush with a fine point. The majority of this miniature was painted with a Size 0 brush, going down to a Size 00 for the ultra-fine details
If this is your first time painting a miniature, then this probably seems a bit intimidating. No worries! You can stick to Step 1,2, and 3. Practice makes perfect, and you’ll be up and running in no time.
The most important thing to remember when painting miniatures is HAVE FUN!
Step 1 - First Layer: Apply Your Base Colors
Axe, Hammer and Metal Decoration – Rough Iron
Trousers – Dark Stone
Fur – Banshee Brown
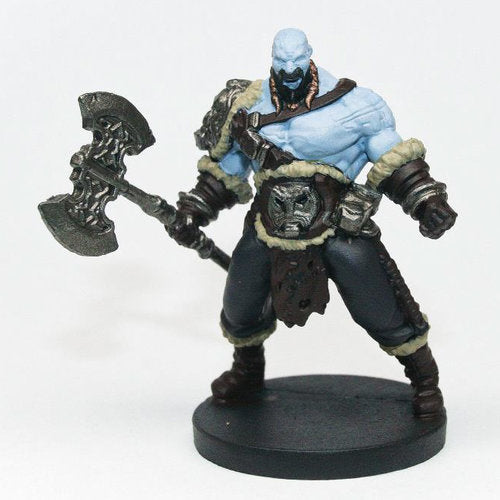
Flesh – Stone Golem mixed with Oozing Purple (50:50)
Leather – Oak Brown
The first step is to start blocking out the different areas of color on the miniature. These will be the darkest shade of each color we use, and form the shadow areas for the later stages.
For Grog, the best place to start is by blocking out the flesh. It’s a pale color, so take your time and do a couple of thin coats of paint to get the best result.
After that, you can work your way around the miniature to block in each remaining color, concentrating on the neatness and getting a solid coverage. No worries if you get paint onto another area; at this stage it’s easy to clean up. Let it dry, and then re-apply the correct color over the top.
Step 2 - Second Layer: Brighten Up Your Base Coat
Axe, Hammer and Metal Decoration – Gun Metal
Trousers – Dungeon Grey
Fur – Skeleton Bone
Flesh – Stone Golem mixed with Ice Storm (50:50)
Leather – Dirt Spatter

Now we will start to add depth to the colors by brightening them up. Concentrating on the raised areas and sections that would be exposed to more light, we start to apply the brighter versions of our base colors. This is generally on the tops of an area, the ridge of a fold of cloth, and on the more pronounced details of a face like the eyebrows, nose, cheeks and lips.
We can now start to define all the muscles on Grog’s torso, as well as the texture of the leather and the sharp edges of the axe. When painting the muscles, be aware of the direction of the muscle – if you paint your brush strokes in this direction (for example horizontally on the chest) then you will enhance the effect.
When applying these, we want to be careful to leave a small amount of our basecoat in the folds and recesses of the area we are working on to act as a shadow.
Steadying your hands and having your miniature on a holder will help greatly with brush control, allowing you to be more accurate with your brush strokes. At this stage we don’t need to be applying as much paint to the miniature as when we did the basecoats, so be careful not to overload your brush.
Step 3 - Third Layer: Applying Some Washes
Axe, Hammer and Metal Decoration – Dark Tone
Trousers – Dark Tone
Fur – Strong Tone
Flesh – Blue Tone
Leather – Strong tone

These washes will help to add shade to the miniature and increase the definition on highly detailed areas. Mix them well but don’t water them down too much or they can dry, leaving a very chalky finish.
The Blue Tone for Grog’s skin, however, will need to be diluted quite a bit. A mix of 2 parts water to 1 part wash will be about right. If it’s not quite showing up, then you can apply a second layer.
Due to the nature of washes, they are much thinner than the paint we have been using and can be harder to control. Don’t overload your brush or allow the wash to pool in the creases as it can run into other areas of the miniature. If you apply too much, simply rinse your brush, dry it off, and then use it to soak up the excess wash from the miniature.
Step 4 - Layer: Re–Defining the Highlights
Axe, Hammer and Metal Decoration – Plate Mail Metal
Trousers – Field Grey
Fur – Corpse Pale
Flesh – Stone Golem
Leather – Werewolf Fur

Now that we’ve used a wash to create shadow and definition on the miniature, we want to brighten up the colors and add more definition to the detailed areas.
Just like before, we want to concentrate these colors on the raised areas/details of the miniature – such as the tip of the nose and cheekbones for the face, the top ridges of the folds for the leather and trousers, and the sharp edges of the axe.
It’s best to use the smaller Size 00 for this stage as you need to be very careful, especially on the face.
Congratulations! Grog is ready to charge into action (or be spectacularly confused by a seemingly simple task).
Step 5 – Optional Final Highlights and Finishing Touches
This is an extra stage where you can choose to go back to the miniature and pick out small details, paint in eyes/mouth, or enhance the details by taking the Size 000 brush and a very dark grey (like Necromancer Cloak) or black to carefully paint in the lines between each different area. This technique is known as “black lining” or “lining in”.
You could also add a further level of highlighting to the miniature if you feel inclined. This would be a very small and specific highlight placed on the very uppermost areas or sharpest of edges and corners. Use a brighter version of our Step 4 colors, or mix in a bit of white or Corpse Pale into them.
This is the stage that we can add in all of Grog’s tattoos. The tattoo shapes are sculpted into the miniature so it’s a case of taking a small brush with a fine point (Size 000 is best for this job) and block them in with Matt Black. If you are feeling up to it you can then highlight these tattoos with a small amount of Dark Stone.

With your miniature painted, you can choose how you would like them to be based. It’s perfectly fine to leave the base black, but just make sure to clean up the edge and give the base a nice even coat of black paint to really help the miniature look finished. Alternately, you can use sand and glue or pumice gel to give the base some earthy texture and then paint it to match whichever setting you like. You can then add some static grass or grass tufts to bring the base to life.

If you plan to use this miniature for gaming, it is a good idea to seal it with either a spray-on sealer such as Testor Dullcote or Army Painter Anti-Shine. There are brush-on options available if the idea of using a spray can on your freshly painted miniature is something you’re wary of. In either case, be sure to follow the application instructions provided. Always test your sealer before applying it to your miniature to make sure it cures correctly.